Introduction
Remootio functions best if the status sensor is also installed and it is enabled in the app. In this tutorial we will explain the operating principle of the sensor and give a few examples on how to install it.
How does the sensor work?
The sensor has two parts:
- Wired part (has 4 meters long cable), which is essentially a switch
- Magnet part (this has no wires)
When the magnet gets close to the switch, the switch closes and when the magnet is not near the switch it opens. Remootio can check if the switch is open or closed so essentially it checks if the magnet is near the switch (wired part) or not.

This means that the sensors need to be mounted in a way that:
- The wired part is in fixed position and the wire is connected to Remootio's status sensor input
- The magnet is mounted on a moving part of the gate/garage door and the magnet aligns with the switch either when the gate is fully open or fully closed
The maximum range of the sensor is approximately 4 centimeters (1.57 inches). The two sensor parts can align either when the gate or door is in the fully closed or in the fully open position, but it is considered to be more secure if the two parts align in the fully closed position. This way a closed status is only detected and displayed when the gate or door is fully closed. And when the two parts are installed in a position that they align in the fully open position, the “flip logic” option should be enabled.
Double-sided tapes are also provided for the sensors, which makes them easier to install. First apply the adhesives to the sensor, and then use it to mount the sensor on the gate or garage door

Step 1) Sensor installation
Connect the sensor to terminal 4 of the Remootio 3 unit and use the included adhesives to mount the wireless part of the sensor on the moving part of the gate or garage door in such a way that it is not further than 30mm from the wired part of the sensor when the gate or garage door is closed.

When enabling the sensor interface in the app, please make sure to select the corresponding input (in this example "input 1").

Step 2) Mounting the sensor
Installation example: Garage door opener
In this example the wired part (B) is mounted on the rail and the magnet (A) is mounted on the moving motor. In the fully open position the magnet aligns with the wired part as seen in the picture below.
An alternative installation is when the two align in the fully closed position. This can be achieved by placing the wired part farther from Remootio along the rail and adjusting the magnet accordingly.

Installation example : Swing gate opener
In this example both parts of the sensor are installed onto a wing of the swing gate. The wired part (B) is installed on the wing closer to the Remootio device.

Installation example : Sliding gate opener
In this example the wireless part of the sensor is installed under the gear rack and the the wired part (B) is placed on the plastic enclosure of the gate motor in which the Remootio is installed.

Step 3) Wiring the sensor into Remootio
The two cables coming from the wired part must be connected to one of the input terminals on the Remootio device. The order of the wires when connecting to the inputs doesn't matter. The inputs of the Remootio are the terminals marked with 4 and 5 in the picture below:
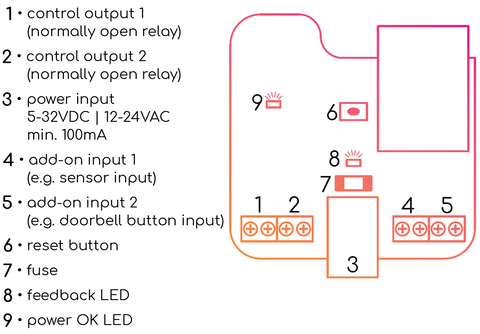
For further information about the connection, please refer to the relevant sections in installation manual of the Remootio 2 and Remootio 3.
Step 3) Enabling the sensor in the app after installation
After installing the sensor, you still need to enable in the app.
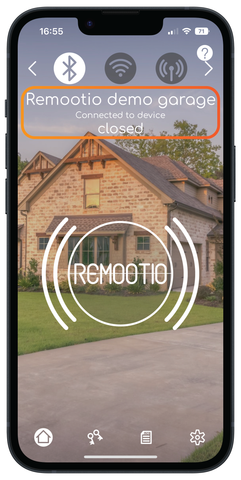
To do this swipe to your Remootio device and make sure you are connected to it. Since you have not enabled the sensor yet it will show no sensor.

Tap on the settings icon in the bottom right corner, scroll down to Gate status sensor and tap on it.

On the screen that opens tap on Enable sensor interface. It is important to select the input that the sensor wires are connected to (terminal 4 is Input 1 and terminal 5 is Input 2).


After this the main screen of the app will show the status of the gate or garage door.
If the status shown by the app is always the opposite of the real status, just enable the Flip logic option in the Gate status sensor menu.